“How to Keep Your Dog’s Paws Perfect: A Comprehensive Guide to Nail Trimming”
The Proper Techniques for Trimming Your Dog’s Nails
Keeping your dog’s nails trimmed is an essential part of their grooming routine. Not only does it keep their paws looking neat, but it also prevents potential health issues such as overgrown nails causing discomfort or even pain. Here’s a step-by-step guide on how to properly trim your dog’s nails.
Step 1: Gather Your Tools
Before you start, make sure you have the right tools. Here are some common tools used for trimming a dog’s nails, how to use them and Pros and Cons of each:
-
Guillotine Clippers: These clippers work like a guillotine. Simply stick the end of your dog’s nail in the hole and squeeze. The blade slides across the hole, trimming off the excess nail. They are easy to use but are better for small to medium-sized dogs as they may not be strong enough to cut through thick, large nails.
- Pros: Easy to use, especially for small to medium-sized dogs. They’re also quite affordable.
- Cons: They may not be strong enough to cut through thick, large nails. Also, the blade needs to be replaced regularly to ensure a clean cut.
-
Scissor Clippers: Also known as Miller’s Forge trimmers, they work like scissors and are strong enough to work on dogs of all sizes. They’re usually used for larger dogs with thicker nails. To use them, position the clipper perpendicular to the nail and cut straight across it.
- Pros: Strong enough to work on dogs of all sizes. They provide a quick, clean cut and are typically durable.
- Cons: They can be difficult to use on small dogs or dogs with tiny nails. There’s also a higher risk of cutting into the quick if not used carefully.
-
Grinder Tools: These tools grind down the nail instead of cutting it. They can be a good option for dogs who hate the feeling of nail clippers. To use them, you simply turn on the grinder and gently press it against the nail, being careful not to get too close to the quick.
- Pros: They’re great for smoothing out rough edges and can be a good option for dogs who hate the feeling of nail clippers. They also reduce the risk of cutting into the quick.
- Cons: They can be noisy, which might scare some dogs. They also create a bit of dust, which can be a nuisance.
-
Nail Files: These can be used after clipping or grinding to smooth any rough edges left on the nails.
- Pros: They’re excellent for smoothing out any rough edges after clipping or grinding. They’re also very easy to use.
- Cons: They’re not suitable for removing a large amount of nail. Using a file can also be time-consuming.
-
Styptic Powder: This isn’t a tool for trimming, but it’s essential to have on hand when you’re cutting your dog’s nails. If you accidentally cut into the quick, the styptic powder will quickly stop the bleeding.
- Pros: It quickly stops bleeding if you accidentally cut into the quick. It’s an essential safety measure to have on hand when trimming your dog’s nails.
- Cons: It can cause a stinging sensation which might be uncomfortable for your dog.
It’s always best to choose the tool that you feel most comfortable using and that works best for your dog’s size and nail type. It’s important to take things slow and give your dog plenty of praise and treats during the process to make it a positive experience.
Step 2: Get Your Dog Comfortable
Start by getting your dog comfortable with the nail trimming process. Show them the clippers, let them sniff it, and give them a treat. This helps to associate the clippers with positive experiences. Preparing your dog for a nail trimming session is just as important as the trimming itself. Here are some techniques and ideas to get your dog ready:
- Start Early: If possible, start trimming your dog’s nails when they are a puppy. They are more likely to get used to it at a young age.
- Make It Positive: Associate nail trimming with positive experiences. Give your dog a treat or their favorite toy after a successful nail trimming session.
- Get Them Used to Their Paws Being Touched: Some dogs are uncomfortable with their paws being touched. Start by gently handling their paws regularly so they get used to it.
- Show Them the Tools: Let your dog sniff and investigate the nail clippers before you use them. This can help reduce fear or anxiety.
- Start Slow: On your first few tries, you might just trim one or two nails, then gradually increase the number as your dog gets more comfortable.
- Use a Calm and Reassuring Voice: Your dog can pick up on your emotions, so try to remain calm and speak in a soothing voice.
- Choose the Right Time: Try to trim your dog’s nails when they are relaxed, such as after exercise or mealtime.
Patience is key. It might take some time for your dog to get comfortable with nail trimming. If you’re having trouble, don’t hesitate to reach out to a professional groomer or your vet for help.
Step 3: Identify the Quick
The quick is the sensitive part of the nail that supplies blood to the nail bed. Avoid cutting into this as it can cause pain and bleeding. Identifying the quick is crucial to avoid causing discomfort or pain to your dog during nail trimming. Here’s how to identify it:
- Color of the Nail: If your dog has clear or light-colored nails, identifying the quick is relatively easy. It appears as a pinkish area within the nail. The area beyond the quick is usually white or translucent, which is the safe part to cut.
- Look for a Change in Texture: As you trim the nail, you’ll notice a change in texture. The nail will go from hard to somewhat spongy when you’re nearing the quick. This is a sign to stop cutting.
- Use a Flashlight: If your dog has dark nails, you can try shining a flashlight from underneath the nail. This can help you see where the quick ends.
- Look for a Small Dot: When you’re cutting the nail, once you see a homogeneous gray (or pink with black specks) oval in the middle of the nail, that’s usually the start of the quick. At this point, you should stop cutting to avoid nicking the quick.
If you’re unsure, it’s better to trim less rather than risk cutting into the quick. If you accidentally cut the quick, your dog’s nail will bleed, and it may cause your dog discomfort. Having styptic powder on hand can help stop the bleeding quickly.
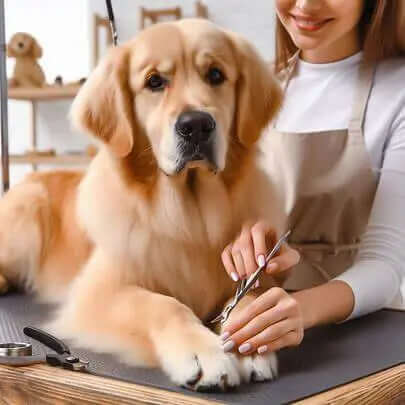
Step 4: Start Trimming
- Hold the Paw: Start by holding your dog’s paw firmly but gently. You don’t want to squeeze too hard and cause discomfort, but you also need to hold it steady. Use your fingers to separate the toes and get a good look at the nails.
- Position the Clippers: Place the nail clippers over the tip of the nail. Make sure you’re not cutting into the quick. If you’re using scissor-type clippers, they should be perpendicular to the nail. For guillotine-type clippers, the nail should go into the hole, with the cutting blade towards the end of the nail.
- Trim a Little at a Time: It’s important to trim a little bit of the nail at a time, especially if your dog has dark nails and you can’t see the quick. This helps prevent accidentally cutting into the quick.
- Watch Your Dog’s Reaction: Pay attention to your dog’s body language. If they seem uncomfortable or try to pull their paw away, stop and give them a break. You can try to soothe them by speaking in a calm, reassuring voice.
- Take Breaks: Don’t rush the process. If your dog is getting stressed, it’s okay to take a break and try again later. You can also try to distract them with treats or their favorite toy.
Step 5: Reward Your Dog
- Use Treats: Treats are a great way to reward your dog during and after the nail trimming process. You can give them a small treat after each nail, or a larger one once you’re done with all the paws. Make sure to choose a treat that your dog loves.
- Praise Them: Dogs respond well to positive reinforcement. Use a happy, encouraging voice to tell them they’re doing a good job. This can help them associate nail trimming with positive feedback.
- Petting and Cuddling: Show your dog some love by giving them a good pet or a cuddle after the nail trimming session. This can help calm them down and show them that they did a good job.
- Play Time: If your dog has a favorite toy or game, play with them after the nail trimming session. This can serve as a reward and also help them burn off any stress or energy from the nail trimming.
- Breaks: If your dog is getting stressed, take a break and do something they enjoy. This can be a short walk, a bit of playtime, or just some cuddles. Once they’re calm, you can try trimming their nails again.
It’s key to make nail trimming a positive experience for your dog. If they’re rewarded and feel good about it, they’ll be more likely to cooperate in the future.
Step 6: Know When to Stop
- Look for the Quick: As mentioned earlier, the quick is the sensitive part of the nail that supplies blood to the nail bed. If you see a dark spot in the middle of the nail when you’re trimming, that’s usually the quick, and it’s time to stop.
- Check the Length: Ideally, your dog’s nails should just about touch the ground when they walk. If you hear their nails clicking on the floor, they’re probably still too long. However, if the nails are well off the ground, you’ve probably trimmed enough.
- Observe Your Dog’s Comfort Level: If your dog starts to squirm, yelp, or show signs of discomfort, it’s a good idea to stop. Some dogs have very sensitive paws and may not tolerate a lot of nail trimming at once.
- When in Doubt, Less is More: If you’re unsure, it’s better to err on the side of caution and trim less. You can always trim more another day, but if you cut too much and injure the quick, it can cause your dog pain and make them fearful of future nail trims.
Step 7: Regular Maintenance
- Regular Trimming: Depending on how quickly your dog’s nails grow, you may need to trim them every two to four weeks. Regular trimming can prevent the nails from overgrowing, which can cause discomfort or even pain for your dog.
- Monitor Nail Length: Keep an eye on your dog’s nails. If you hear them clicking on the floor when your dog walks, it’s probably time for a trim. Ideally, the nails should just touch the ground.
- Check for Split or Cracked Nails: During your regular pet grooming routine, check for any split or cracked nails, which can be painful for your dog. If you notice any, it’s best to consult with a vet or professional groomer.
- Don’t Forget the Dewclaws: Some dogs have dewclaws, the nails located on the inner side of their paws. These don’t wear down as naturally as the other nails, so they may require more frequent trimming.
- Keep the Paws Healthy: Nail care is just one part of paw care. Maintaining your dog’s paw pads is an important part of their overall health and comfort. Here are some tips:
- Regular Checks: Regularly check your dog’s paw pads for any signs of injury such as cuts, blisters, or foreign objects lodged in the pad. Also, look out for any signs of dryness, cracking, or peeling.
- Clean Paws: After walks or outdoor play, clean your dog’s paws to remove any dirt, chemicals, or harmful substances they may have stepped on. You can use a damp cloth or pet-friendly wipes for this.
- Moisturize: Just like human skin, dog paw pads can become dry and cracked. Use a pet-safe moisturizer to keep them soft and prevent cracking. Avoid using human lotions or moisturizers as they can soften the pads too much and lead to injury.
- Protect from Hot and Cold Surfaces: In the summer, pavement can get hot enough to burn your dog’s paw pads. In the winter, ice, snow, and salt can cause damage and discomfort. Protect their paws by limiting their exposure to these surfaces or use dog booties for protection.
- Trim Hair Between Pads: Some dogs have hair that grows between their paw pads. This can collect dirt and debris. Keep this hair trimmed to prevent matting and irritation.
- Use Paw Balm: Paw balms or waxes can provide an extra layer of protection for your dog’s paws, especially in extreme weather conditions. They can also help to soothe and heal damaged paw pads.
-
Consult a Professional: If you’re uncomfortable trimming your dog’s nails yourself, or if your dog finds the process very stressful, consider taking your dog to a professional groomer or vet. They are trained in proper nail care and can ensure the process is safe and comfortable for your dog.
Remember, if you notice any severe issues or if your dog seems to be in pain, it’s best to consult with a vet. They can provide appropriate treatment and advice for maintaining your dog’s paw health. Every dog is different, and what works for one may not work for another. Always do what’s best for your dog’s comfort and health. If you’re uncomfortable doing this at home, it’s always best to take your dog to a professional groomer or vet. They are trained in proper nail trimming techniques and can ensure the process is safe and stress-free for your dog. Happy grooming!